Creating and Editing Molding Profiles


Reference Number: KB-00166
Last Modified: April 26, 2024

The information in this article applies to:

Chief Architect Premier or Chief Architect Interiors


QUESTION

I want to draw a custom molding profile and add it to my library. Alternatively, I found a molding profile in the library that is similar to what I need, but I would like to make some minor changes to it. How would I go about this?

Draw a custom molding profile for use in your home design using Chief Architect.


ANSWER

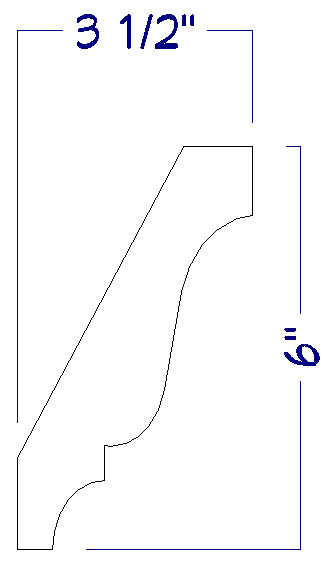
Custom molding profiles can be drawn in either floor plan view or in a CAD detail window and should be drawn at their actual size.

You can easily make changes to an existing molding profile in the library and then save your edited profile into the User Catalog for future use.


To create a molding profile

  1. Select CAD> Lines> Draw Line from the menu.


  2. Draw a vertical line to form the back of the molding profile.

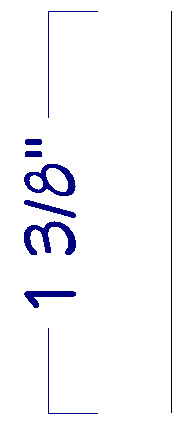
    For window casing, base or crown molding, or a chair rail, the back of the molding (the part that is against the wall) should be drawn vertically so that it forms the left side of the polyline.


    CAD line drawn vertically for the backing of the molding profile


  3. Using the various CAD tools, draw your desired molding profile at its actual, unscaled size. The back of most profiles, or the side facing the wall, must be drawn as a vertical edge on the left side of the polyline. 

    Custom molding profile created using CAD objects


  4. With the profile created, select it to highlight it, and then click on the Add to Library edit button.

    The molding will now be added to your Library Browser to be used in your designs.


To edit an existing molding profile

  1. In floor plan view or in a CAD Detail window, select View> Library Browser  from the menu to open the Library Browser window.


  2. Browse to Chief Architect Core Catalogs> Architectural> Moldings, Profiles, Extrusions and select a molding profile that you would like to customize. Alternatively, if you would like to customize a molding profile that has been added to your User Catalog, browse to the location of that profile instead.


  3. Right-click on the molding profile you would like to modify and select the Place Molding Profile option from the menu.

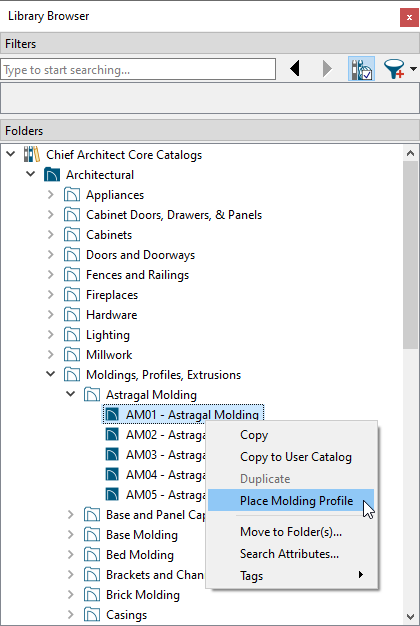
    If you right-click on a molding profile that is in the User Catalog, selecting the Open Object option will open a Molding Specification dialog where the Molding Height, Molding Width, Profile Rotation*, and a variety of other properties can be modified.

    *Profile Rotation is only available in X13 and newer program versions.


    Selecting the Place Molding Profile option for a molding in the Library Browser


  4. Move your cursor into the drawing area and click in an empty space to place a polyline representing the molding profile.


  5. Using the Select Objects  tool, click on the molding profile polyline to select it.


  6. Using the edit handles, edit toolbar buttons, and/or settings in the profile's Polyline Specification dialog, edit the profile as desired.


  7. When you are satisfied with the appearance of the edited molding profile, select it and click the Add to Library edit button to add the modified molding profile to the User Catalog in the Library Browser.

    To learn more about molding profiles, refer to your programs Help documentation, as well as the Related Articles section below.